Smart lamps are expensive and there are very few out there! Throwing smart bulbs in might be great but when someone turns off the light at the switch it makes them useless. Since starting the home automation adventure, I have wanted to find a relatively cheap solution to this problem. Armed with a 3d Printer and some Shelly 1 Plus devices, I think I have found the solution.
Lets start with a warning though, this is a fairly simple process, but you will be touching mains electronics… if you mess up you could have 240v running through you. That can seriously hurt you or even kill you. While I will be walking through the process, this is not intended to be a guide and I take no responsibility for any harm or injury. I am just an idiot with no respect for my own safety.
What you will need

- Wire strippers
- Shelly 1 Plus (Other Shelly devices will work, but I am not documenting that).
- Wago connectors
- Switch rated for mains electricity (I re-used the one in my Ikea lamp)
- Electrics box (I 3d printed mine. )
- Some brown and blue wire (I recommend taking some from the light’s cable)
Wiring it up ⚡⚡⚡
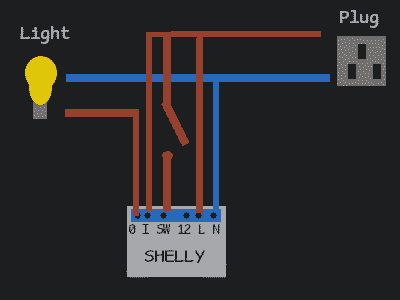
This is how it will be connected up:

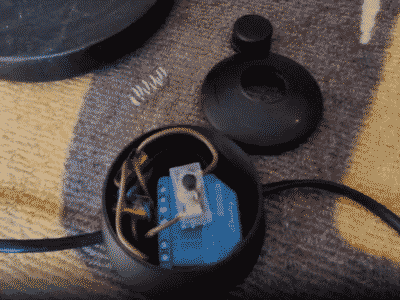
When I had it all wired up this is how mine looked:
 It’s a bit of a mess but when closed up, it is fine. I want to design a case that better fits the Shelly 1 Plus as the model I am using is designed for the Shelly 1. The main problem is I can’t screw it closed and ended up having to use superglue which isn’t great.
When it is all wired up, you can plug it in. I won’t go through the setup process in detail here, but you basically just need to connect to the Wi-Fi network of the Shelly and go to 192.168.33.1 and you should be able to get your device connected to your home network. Just make sure you disable the Wi-Fi AP on the Shelly, so people can’t mess around with your lighting or steal your Wi-Fi password.
The Case
The Case
Depending on what light you are using you might have to get a little creative on the housing. You can use an electrics box and cut a hole in for the switch. Though, if you have a 3d printer I would strongly recommend finding a model and printing it. While the file I printed adds some vertical height, it still looks very slick and works really well. The lamp is called the Ikea Vidja light and I managed to find this model for the Shell 1 LINK.
Conclusion
This worked really well! I was worried about it all being a bit of a mess but thankfully it all worked out well. In time I will start going through the rest of the lights in the house and automating them but for now I think I am content with just this one as the ones by my bed are not that useful… Unless I could automate turning them on in the morning?

Part Two Coming Soom™
…
…
…
Part Two is HERE
